Below is a list of supplies that I used on this project:
- One 15" length of a pine 1x12 board.
- Five 8-foot 1x2 pine boards.
- Wood Glue
- Picture hanging wire, 2 washers, 2 screws for the hanger.
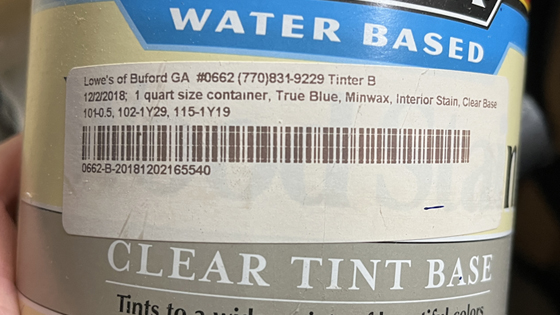
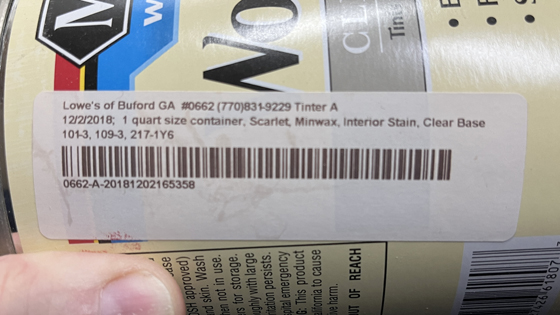
- Minwax Tintable Water-Based Stain (Below are the Lowes formulas for custom tinting the stain Scarlet Red and True Blue, in case they remove them from their standard color list.)
Lowes Stain Formulas
 |
| Designing the Stars in the Inventables EASEL PRO Software |
Here are the basic instructions for this project:
- Cut six 37" stripes.
- Cut seven 22" stripes.
- Cut four 19" braces for the back.
- Cut one 10.5"x15" panel. (Note: The 1x2's from the home center can vary in width. Measure the height of the seven short stripes and cut the panel to match.)
- Round over the front edges with a 1/8" roundover bit in a router.
- Use a blow torch to scorch the wood (if desired).
- Stain three 37" stripes and four 22" stripes Scarlet Red.
- Stain the panel True Blue.
- Add the stars to the panel. I used my Inventables X-Carve CNC Machine and the EASEL PRO software to engrave the stars with a 90 degree V-Bit. Click here to open my Stars project.
- Glue the flag together using minimal wood glue to avoid lots of squeeze out.
- Clamp the flag to pull it all together.
- Attach the four braces to the back with glue and nails. Make sure one brace overlaps the joint between the union and the shorter stripes. Space them evenly.
- Spray with a clear coat finish. I used Deft Clear Wood Finish Satin Lacquer.
 |
| Assembling the Flag |
If you don't have a CNC machine, check out these other options for adding stars to the panel:
- Paint and Stencil - Use a stencil to paint the stars. Click here to order one for a 19.5"x37" flag.
- Hand Carving - Print a paper template to use as a guide to carve the stars with a carving knife.
- Dremel Tool - Draw the stars onto the panel using a template, then engrave them with a Dremel tool.
- Laser Cut Stars - Glue on some laser cut stars. Click here to order a pack of 1.25" stars for a 19.5"x37" flag.
 |
| Hang the Flag using Picture Wire, Washers and Screws |
Clicking a referral/affiliate link in this article and making a purchase will help to support my channel via a small referral fee from the merchant. Thank you for your support!


Going to make one now looks good
ReplyDeleteGreat Joe! They are fun and quick to make. I think the staining was the most time consuming part, and even that was fun.
DeleteBesides your CNC MACHINE what is the second best way to do the stars. I can't afford one OF those CNC MACHINED and I would like to make a few of these flags. AWESOME JOB BY THE WAY
DeleteI would glue on wood stars.
Delete