Pages

Tuesday, May 26, 2015

Sidebar Conversation - Stickers, Crown, R2-D2, X-Carve, Contests, Pens, Georgia Channels, Viewer Projects

In this shop update, I talk about recent projects, contests, and my new X-Carve progress.  I also recommend several channels that are based in my home state of Georgia, plus I show some viewer projects.  Check it out!


Below are links to everything I talked about in this Sidebar Conversation:

Stickers - If you would like to support my shop and buy a sticker, then Click Here.  If you would like to trade stickers, email me at thecarmichaelworkshop@gmail.com for my address.  Send me your sticker and I'll send you one of mine.

Thanks to Drew Short at Rock-N H Woodshop for the awesome shirt and hat!

Thanks to the folks at Hobby 4 Charity for sending me the Pooping Moose prototype.  They are selling woodworking projects for charities in Pennsylvania, so check out their stuff.  My Twisted Christmas Tree design is one of their latest additions!  Cool!


Enter the Summers Woodworking 2x4 Contest!  The deadline is May 31st!

Thanks to Brian at Summers Woodworking for this cool pen.  From what I understand, the blank came from Marc's Ink Pens.


Thanks to Dominic’s Woodworks for hosting the Challenge Tree event!  I won some cool pen blanks and a pen kit from Zac Higgins of NV Woodwerks, so thanks to Zac for the awesome prize!

Here are some YouTube channels that are also based in Georgia.  Grab a sweet iced tea and watch some of my neighbors.  Subscribe and tell them Steve sent ya!


Tuesday, May 19, 2015

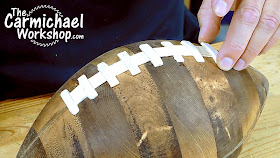
Wooden NFL Football made from a 2x4!

Every year I get a couple of opportunities to be creative with a regular 8-foot 2x4 for 2x4 contests.  I maintain a running list of ideas for when the time comes.  This time, I attempted to make a regulation-size NFL Football!  Watch my video to see how it turned out.


NFL footballs are about 11” long and 22” around the middle.  I was tempted to glue together several 11” lengths of 2x4 into a block, but I didn’t think the seam lines would look very good.  So, I decided to edge-glue the 2x4 and cut two each of 6.75”, 6.5”, 5” and 3” circles, then and stack them to make the blank.  I glued the circles together with the joint lines crossing each other for strength, and I used small dowels to keep them from slipping.


I’m a novice on the lathe, but I was able to turn the blank into something that resembles a football shape.  Softwood is difficult to turn down to a smooth surface.  This is the largest chunk of wood I’ve had on my lathe yet and it was pretty intimidating.  I turned the ends down as far as I felt safe doing so, then removed the football and sanded the points on the belt sander.  This worked well.


I wiped on some MinWax Pre-Stain Wood Conditioner and Early American stand and let it dry overnight.  I used a handsaw to cut four seam lines lengthwise on the football, then filled the seam lines with additional stain.  It took a while for the stain to dry in the Georgia humidity.


Once the stain was dry, I gave the whole football a light sanding to give it some roughness.  I cut some small pieces from the 2x4 scraps to make up the top seams and glued them on.  I think the seams are a little larger than a real football, but they still look cool.  I also had enough 2x4 leftover to make a display stand.


After a few coats of spray lacquer, the 2x4 Wood Football and stand were complete.  It actually turned out to look somewhat real to a degree.  The extra time it took to glue together the circles with alternating joints really paid off with a cool striped effect.  Due to the limited width of the 2x4 and a little too much turning on my part, my football ended up being 11” long and only about 20” around.  That’s ok though, because I’ve heard the NFL footballs can be a little deflated sometimes too.  ;-)


Monday, May 11, 2015

Make a Fold-Up Work Table

To get ready for a new X-Carve CNC machine from Inventables.com, I built this space-saving fold-up work table.  I have a small shop and this table will allow me to fold up the CNC machine between projects, but it could work for other purposes.  Check out my video of this project!


I haven't seen anyone try this before, so I'm not sure how well it will work or if it will affect the CNC machine at all.  The work surface is 48" x 48" and it measures 36" tall.  I know I will be modifying the work table as I run into things that I didn't think about ahead of time.  Below is a list of things that I expect to work on:
  • I need to find a way to secure the front two legs so they will not fold up accidentally.  I may just use two temporary screws to hold them in place, and just remove them to fold up the table.
  • The X-Carve has some external components that drive the machine.  I will need to find a way to mount these that will allow the table to fold up.
  • When the motors are not engaged, the gantry will slide freely.  I will need to remember to push it to the back of the table before folding it up to avoid a crash.  I plan to add some supports that will hold the gantry up so it does not sag or bend when the machine is on its side.
  • It's important that a CNC machine is on a solid, flat surface in order to cut accurately.  I was careful to use the straightest materials for the table top.  It is flat, but I may need to upgrade the 1/4" plywood with something sturdier if it flexes too much.


If you would like to build one of these fold-up work tables, click here to download my PDF diagram and cut list.  It is a fun project and since it's made mostly from 2x4's, it is budget friendly.  I really like how it saves space, plus it's free-standing so I can move it if I need to.


Just as I finished building the work table, the X-Carve arrived!  I'm so excited!  I will set up the machine and attach it to the work table, then post a follow-up to show you how it is working out.


Monday, May 4, 2015

R2-D2 Birdhouse - Star Wars Day Woodworking Collaboration 2015

The 4th of May is Star Wars Day, so a group of us woodworkers have collaborated to release Star Wars woodworking projects!  I made an R2-D2 Birdhouse so check out my video to see how it turned out!


To make the dome, I glued up a block of wood and turned it on the lathe with my new bowl gouge.  I painted it chrome, then masked off the areas that would be blue and painted it with metallic blue paint.  A silver Sharpie matched the chrome paint perfectly, so I used it touch up any rough edges on the blue paint.  I glued on the additional round discs to embellish it.


The body started out as an octagon, then I used a combination of my bandsaw, sander, and lathe to shape the outside round like a cylinder.  I painted it white and drew the decorative lines with a straight edge and Sharpie markers.  I also masked off some areas and sprayed them metallic blue.  I used small Velcro pieces to attach the dome.


I cut the legs using a template that I created based on a picture of R2-D2.  There is a silver disc between each leg and the body.  I sanded a curve on one side to match the contour of the body and glued them on.  The legs are attached to the discs with screws.  In this picture, you can see the line details that I drew on the back with a straight edge and a silver Sharpie.


The two feet have what I think are R2-D2's battery packs glued to them.  I sanded one corner to match the angle of the foot, then glued them on.  I drilled shallow holes and glued in some bronze cord for the "wiring".


I used several different paints and markers to decorate R2-D2.  I really like the chrome and metallic blue spray paints, but they don't work very well on end grain.  Maybe I will try a wood filler next time to see if I get better results.  I'm really pleased with these colors!


Click here to download my R2-D2 Birdhouse cutting templates.  These templates will help you build the main structure, but the artistry of decorating R2-D2 is solely up to you!  Have fun, and if you build an R2-D2 too, I would love to see a picture of it.  Also, don't forget to watch the other videos on the 2015 Star Wars Day Collaboration Playlist!  May the 4th be with you!